Contents

  1. Introduction
  2. Hardware
    1. Information
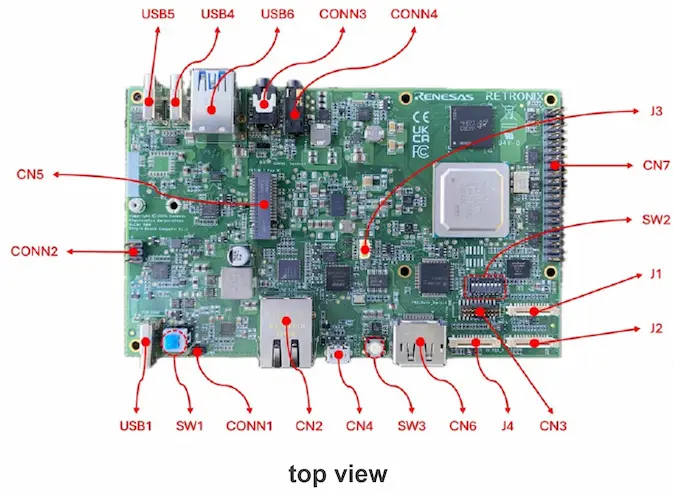
    2. Picture
    3. Features
    4. Switches Assignment
      1. Boot mode
      2. Other switch
    5. Debug Serial
    6. Caution
  3. Software Version List
  4. Quick Start
    1. How to build
    2. How to flash
      1. Flashing loader
      2. Flashing OS image into SD card
    3. How to boot
    4. How to run applications
      1. Software support list
      2. CAN
      3. Audio
      4. GPIO
      5. I2C
      6. UART
      7. Thermal
      8. Pi Camera
      9. Pi Display
      10. Pi Active Cooler
  5. Tips
  6. Known Issues & Restrictions
  7. Support

Introduction

This is the page for Sparrow Hawk board with R-Car V4H provided Retronix Technology Inc.

Hardware

Information

Board Name Kit R-Car V4h SoC version SoC Information Board Information Where to Buy
Sparrow Hawk
(DDR8GB/16GB)
Complete/Basic v3.0 R-Car V4H Sparrow Hawk
provided by Retronix Technology Inc.
Shimafuji

Picture

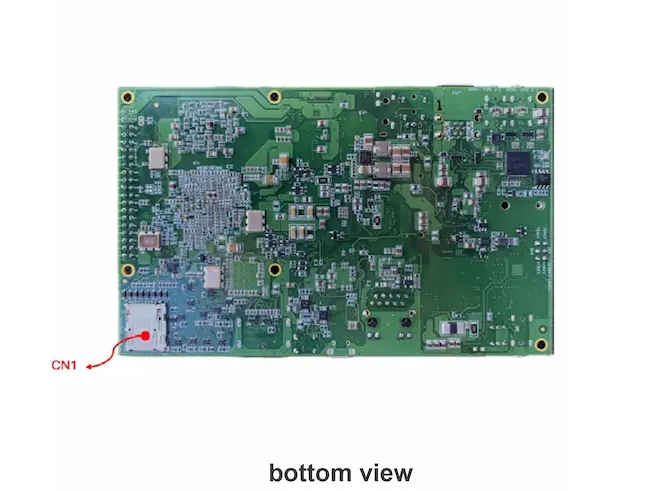
Sparrow_Hawk_assignment Sparrow_Hawk_assignment

Features

Function Interface Specification
CPU - 4x Arm® Cortex®-A76, 3x Arm® Cortex®-R52
GPU - AXM-8-256
DRAM - 8GB/16GB LPDDR5
Flash Memory - 64MB QSPI
Camera I/F J1, J2 2x Raspberry Pi Camera
Display CN6, J4 1x DP, 1x DSI
Ethernet AVB CN2 1 Port (1Gbps)
Debug Serial CN4 2 Port
Audio CONN3, CONN4 In/Out, In
PCIe4.0 CN5 1x M.2 Key-M (x2 lane)
USB3.0 USB4, USB5, USB6 2x USB type-A, 2x USB type-C
CAN-FD CONN2 2 Port
PWM J3 1 Port
JTAG CN3 1 Port
Removal Media CN1 1x MicroSD
Extensions CN7 Raspberry Pi 40-Pin CN
Mode Switches SW2 Dip SW
Power USB1(Input) USB PD 20V
Power Control SW1, SW3, CONN1 2x SW, 1x Jumper

Switches Assignment

Boot mode

SW2-1 SW2-2 SW2-3 Description
ON ON ON Serial Flash boot at single read 40MHz using DMA
OFF OFF OFF SCIF/HSCIF download mode

Other switch

SW2-4 SW2-5 SW2-6 SW2-7 SW2-8 Description
OFF ON ON ON ON Initial setting

Note: For more detail, please refer to board User’s Manual.

Debug Serial

This board has two serial devices and ChA(HSCIF0) is used for mainly.

Channel Baudrate Format Flow Control
ChA(HSCIF0)
ex) COM<lower num>, /dev/ttyUSB<lower num>
921600 bps 8N1 none
ChB(HSCIF1)
ex) COM<higher num>, /dev/ttyUSB<higher num>
115200 bps 8N1 none

Caution

FAN must be installed. Do not remove FAN for cooling the R-Car V4H from the board, as doing so will lead to the R-Car V4H being overheated to destruction. It is recommended to use a heat sink and FAN together.

Software Version List

Software Version
Yocto Project 5.0.12
Debian 12
Linux kernel 6.12.49
U-Boot 2025.07

Quick Start

How to build

Software How to build Binary
Yocto BSP Please see https://github.com/rcar-community/meta-sparrow-hawk https://github.com/rcar-community/meta-sparrow-hawk/releases
Debian based BSP Please see https://github.com/rcar-community/kernel-apt-repository https://github.com/rcar-community/kernel-apt-repository/releases

How to flash

Flashing loader

Run script in ipl-burning directory(Linux: run.sh, Windows: run.bat). If using Linux host PC, please install python3 and pip command on your system before running the script.

ipl-burning.zip can be downloaded from https://github.com/rcar-community/meta-sparrow-hawk/releases. Please close other console which uses serial port of the board before executing the script.

Note:

This script use serial device /dev/ttyUSB* in Linux. But, it cannot be accessed from user without previledged right by default settings. Please use sudo command or add current user into dialout group.

Flashing OS image into SD card

Linux case

Windows case

  1. Extract gzip image using 7zip or similer software.
  2. Flash extracted image into SD card using Etcher, win disk imager, and so on.

How to boot

  1. Insert the SD card into CN1 which is bottom of the board.
  2. Open terminal application and open serial device.
  3. Press SW1 to power on the board.
  4. After booting U-Boot, please press any key while showing “Hit any key to stop autoboot:” to enter U-Boot shell.
  5. Input following command into U-Boot shell and press enter key.
    env default -a; boot
    
  6. If command and environment is correct, Linux kernel log will output.

If you want to boot OS image automatically when power on the board, please run following to setup autoboot. Run following command:

env default -a
saveenv

After that, OS image boots automatically when power on the board.

How to run applications

This section is based on Yocto BSP. If you use Debian based BSP, it may need to install additional packages.

Software support list

Feature Status
CAN OK
Ethernet OK
Audio(Output/Input) OK
Display Port OK
GPIO OK
I2C OK
JTAG OK
USB3.0 Not supported
UART OK
Thermal OK
M.2 Not supported
Pi Camera OK
Pi Display OK
PCIe Endpoint Not supported
Pi Active Cooler OK
GPU Not supported
AI Accelerator Not supported
Desktop(GUI) Not supported

Note:

“OK”: Function scceeded in the simple test as below.
“Not tested”: Function wasn’t tested.
“Not supported”: Function isn’t supported.

CAN

Loop back

  1. Connect the following pins of CONN2: Connect Pin1(CAN1L) - Pin2(CAN0L) and Pin5(CAN1H) - Pin6(CAN0H)
  2. Execute following commands on Linux:
    ip link set can0 up type can restart-ms 100 bitrate 1000000 dbitrate 5000000 fd on
    ip link set can1 up type can restart-ms 100 bitrate 1000000 dbitrate 5000000 fd on
    candump can0 &
    cangen can1 -I i -L i -D i -f -n 16
    killall candump
    candump can1 &
    cangen can0 -I i -L i -D i -f -n 16
    killall candump
    

Audio

  1. Connect headset/earphone/Speaker to CONN3.
  2. (if possible) Connect audio output like a smartphone to CONN4.
  3. Setup(Mix Aux in and Headset mic and setup audio output via CONN3)
    amixer set "Headphone" 40%
    amixer set "Headphone" on
    amixer set "Mixout Left DAC Left" on
    amixer set "Mixout Right DAC Right" on
    amixer set "Aux" on
    amixer set "Aux" 80%
    amixer set "Mixin PGA" on
    amixer set "Mixin PGA" 50%
    amixer set "ADC" on
    amixer set "ADC" 80%
    amixer set "Mixin Left Aux Left" on
    amixer set "Mixin Right Aux Right" on
    amixer set "Mic 1" on
    amixer set "Mic 1" 80%
    amixer set "Mixin Left Mic 1" on
    amixer set "Mixin Right Mic 1" on
    
  4. Test function
    1. Recording and Playback test(5sec)
      arecord -D hw:0,0 -t wav -d 5 -c 2 -r 48000 -f S16_LE | aplay
      
    2. Only Playback test
      speaker-test -c2
      

GPIO

Toggle GP2_12(Pin11 on Pin Header)

  1. Connect LED or Oscilloscope to the board
  2. Execute following command
    python3 /usr/bin/example-apps/toggle_gpio_GP2_12.py
    

For more examples, please see also https://github.com/brgl/libgpiod/raw/refs/heads/master/bindings/python/examples

I2C

Please search i2c-tools to use other commands(i2cdump, i2cget, i2cset, i2ctransfer).

UART

Loop back

  1. Connect UART TX and RX(pin 8 and pin 10) on PinHeader.
  2. Execute following commands:
    stty -F /dev/ttySC2 -echo
    cat /dev/ttySC2 &
    echo Hello > /dev/ttySC2
    

Thermal

Pi Camera

Note: Currently, Raspberry Pi Camera V2 is only supported.

  1. Connect Raspberry Pi Camera V2 to J1 and/or J2 connector.
  2. Setup for using camera
    • Change bootcmd variable on U-Boot shell as follows:
      setenv bootcmd "load mmc 0:1 0x58000000 /boot/fitImage && bootm {CONFIG}"
      
    • Cobination of connected cameras

      J1 J2 CONFIG
      Conncted - 0x58000000#default#j1-imx219
      - Conncted 0x58000000#default#j2-imx219
      Conncted Conncted 0x58000000#default#j1-imx219#j2-imx219
  3. Check camera device is recognized
    root@sparrow-hawk:~# cam -l
    [0:00:08.819902729] [325]  INFO Camera camera_manager.cpp:330 libcamera v0.5.2+25-d54e5537-dirty (2025-09-27T03:50:30UTC)
    [0:00:08.845788333] [326]  INFO IPAProxy ipa_proxy.cpp:180 Using tuning file /usr/share/libcamera/ipa/rkisp1/imx219.yaml
    [0:00:08.848443824] [326]  WARN RkISP1Ccm ccm.cpp:62 Failed to parse 'offsets' parameter from tuning file; falling back to zero offsets
    [0:00:08.848978126] [326]  INFO Camera camera_manager.cpp:220 Adding camera '/base/soc/i2c@e6508000/cam@10' for pipeline handler rcar-gen4
    [0:00:08.851155294] [326]  INFO IPAProxy ipa_proxy.cpp:180 Using tuning file /usr/share/libcamera/ipa/rkisp1/imx219.yaml
    [0:00:08.853023642] [326]  WARN RkISP1Ccm ccm.cpp:62 Failed to parse 'offsets' parameter from tuning file; falling back to zero offsets
    [0:00:08.853417723] [326]  INFO Camera camera_manager.cpp:220 Adding camera '/base/soc/i2c@e6510000/cam@10' for pipeline handler rcar-gen4
    Available cameras:
    1: External camera 'imx219' (/base/soc/i2c@e6508000/cam@10)
    2: External camera 'imx219' (/base/soc/i2c@e6510000/cam@10)
    
  4. Test camera
    1. Display Output(Need to connect Display)
      cam -c <camera_index_num> -C -D
      #
      # Note: <camera_index_num> is got from cam -l command output like following;:
      #       Ex.) <camera_index_num>: External camera 'imx219' (/base/soc/i2c@xxxxxxxx/cam@10)
      
    2. Using camshark(Need to connect Network and Linux PC)
      • Please execute following command on Linux PC.
         sudo apt install pipx
         pipx install git+https://gitlab.freedesktop.org/camera/camshark.git
         camshark root@<sparrow_hawk_ip_address>
        

Pi Display

  1. Setup
    • Connect Raspberry Pi Touch Display 2 cable to the J4 connector.
    • Connect the Power (red wire) to pin 2 of CN7 and the Ground (black wire) to pin 6 of CN7.
    • Pi Display
  2. Change bootcmd variable on U-Boot shell as follows:
    setenv bootcmd "load mmc 0:1 0x58000000 /boot/fitImage && bootm 0x58000000#default#rpi-display-2"
    
  3. Display will work correctly after changing above.

Pi Active Cooler

Manual control of fan speed

echo 2 > /sys/class/hwmon/hwmon4/pwm1_enable
echo 150 > /sys/class/hwmon/hwmon4/pwm1

#1 ~ 255 is acceptable but low speeds are not recommended from thermal perspective.

Tips

  1. Linux kernel doesn’t boot multiple CA76 core. Only 1 core is available.
    This is due to skip running arm-trusted-firmware before starting linux kernel. This board has U-Boot SPL and U-Boot( running EL3 ). This is different point from other R-Car evaluation board. If you use booti command as same as other R-Car board, this issue is occurred. The correct boot process is to use fitImage which contains arm-trusted-firmware and Linux kernel and devicetree. By using fitImage, arm-trusted-firmware runs before starting Linux kernel and Linux kernel can handle multiple cores correctly.
  1. There is no output on serial console when power on the board.
    You can check following list to confirm board is broken or not.

Do you write the loaders into the board?
Do you change DIP-SW as correct settings?
Do you use correct serial device? This board has two serial devices and lower number is used for mainly.
Do you use correct USB-PD power supply? This board needs 20V3.25A(65W) output at least.

  1. How to use HDMI display instead of DP display.
    This board doesn’t support passive adaptor so that please use active adaptor.
  1. How to flash sdcard without removing the card from the board.
    Preparation: TFTP server on your host PC and network connection between board and your host PC. And copy the gzipped image file into tftp server root.

ex.) /tftp/core-image-minimal-sparrow-hawk.rootfs.wic.gz

Execute following command on u-boot shell:

Note: After this operation, all data is erased on the SD card which is inserted in the board.

setenv ethaddr
setenv serverip
setenv ipaddr
tftp ${loadaddr} <image file with gzipped> && gzwrite mmc 0 ${loadaddr} ${filesize} 400000 0

ex.) tftp ${loadaddr} core-image-minimal-sparrow-hawk.rootfs.wic.gz && gzwrite mmc 0 ${loadaddr} ${filesize} 400000 0

  1. Why my Headset Mic is not working?
    There are two types of 4pin Headset. one is CIST which is default of sparrow-hawk. the other is MIST. The only deference is pin assign of MIC and GND. If you use MIST type of headset, please modify the board as follows:

Mount :R631 , R632
Unmount :R630 , R633

  1. How to expand the rootfs
    Please run “expand-roofs.sh” script on your board. Rootfs is expanded to use whole storage.

Known Issues & Restrictions

  1. USB Type-C port doesn’t support DP-alt mode so that Display output is not supported. Please use DisplayPort or Raspberry Pi touch Display 2 instead of type-c.
  2. FAN/Heat sink less doesn’t work well due to high temperature in some case. Please attach the Heatsink and FAN to use the board.
  3. PCIe module outputs error log that firmware is not found in boot process. We are preparing the PCIe firmware, then please ignore it and please wait a moment.
    [    2.629357] pcie-rcar-gen4 e65d0000.pcie: Failed to load firmware (rcar_gen4_pcie.bin): -22
    

Support

FAQ: https://github.com/orgs/rcar-community/discussions/categories/faq

Q&A Forum: https://github.com/orgs/rcar-community/discussions/categories/q-a